Friday, July 31, 2015

Put Moar Cats on It!

A few years ago, putting birds on things was all the rage, thanks to a ridiculous sketch by Portlandia's geniuses. I like birds just fine but am really more into cats, so I did a brief holiday series where I put cats on things instead. The other thing that happened a few years ago was I potato-printed cats onto some scraps of IKEA sheet I had leftover from another project. Well, now that SHB has taken over my sewing room, I need to go through my stash and actually use stuff, like, for reals now. Maybe by the time he's ready to move to a big kid bed, I'll finally have all the boxes of fabric out of his room...hah! Like the stash will ever be used up! Anyway, I finally sewed up the cat fabric into something more useful for work than the original plan of hipster scarves.


Because the lengths of fabric were so long and narrow (about 16"x50"), I didn't have enough to do the entire blouse in one fabric. I chose the more sedate-looking seated cats for the front, and saved the slightly more "frolicky" cats for the back and the bow. Business in front, party in the back, right? The narrow length also meant that I couldn't fit the entire back pattern piece onto the fabric, so I cut it out as two pieces by adding seam allowance back to the center line. I also hate sewing fisheye darts, so I eliminated them and carved out the difference at the center back line since I was putting a seam there anyway. 

The pink line shows my new stitching line. 
I didn't even bother trying to match the print. And now that I look at the picture, I would lower the back neckline a bit.

Another problem with my limited fabric was the inability to make a bias-cut collar/bow. I was originally going to leave it off entirely and just make it a sleeveless faux-Colette-Aster, but it just looked like it was missing something. Remembering this blouse that I loved, but doesn't fit anymore, I took the remaining scraps and made two ties on the length-wise grain and just attached them above the button band. I think I like this version of the pussy bow blouse better because I hate having extra fabric around my neck. This way, I still get the bow but can keep the neckline clean. 


Summary:
Pattern: Simplicity 1779
Fabric: 100% cotton IKEA sheet remnants, printed with Tulip fabric paint cats. Sheets are usually quite stiff but this one is very loosely woven, so it actually drapes quite nicely while still retaining just enough body for a blouse like this.
Notions: Interfacing for the button band, bias tape for the neck and armholes, six 1/2" gray buttons (the pattern calls for 5, but I would've had gaping at the bust with that arrangement)
Hours: About five? This happened over the course of two weeks, so I don't really remember/know anymore. 
Will you make it again? Possibly? This is definitely a good basic work blouse. 
Total cost: This was a remnant of a sheet from the as-is section, and the buttons were a dollar, so I'm guessing maybe $3. 
Final thoughts: Since the blouse is sleeveless, it will fit under cardigans better for work, and the fact that it opens in the front makes it nursing accessible. And let's get serious now, what's not to love about a pussy-bow blouse with self-printed cats? I've often lamented the lack of apparel-appropriate cat fabric, so I guess it's time I took matters into my own hands and made my own! 

Moar cats is always better! 

Tuesday, July 28, 2015

A Spate of Sewing

I looked at the calendar yesterday and realized that this is the last week of my summer! How is it the end of July already? Teachers go back for inservice next Monday, so no more sewing every naptime...boo! I've been quite productive this last month, even if none of it made it to the blog; my hair had gotten ridiculously long and straggly, so every time I looked at myself in the mirror I just hated how it looked and couldn't get up the wherewithal to take photos. But! I finally got a haircut and put on my big girl panties (literally) and took pictures of everything. They're not the best photos, but I need to just record everything before I forget what the sewing process was like. At least I'm not the only one who has trouble with the photo documentation part of sewing...


Outfit #1: Real Housewives of San Lorenzo
I got this pair of leopard-print pants in a clothing exchange when I still lived in TCOCC, but they were flared at the bottom. Since the top fit well, I figured I could just skinnify the legs. It only took three years to get around to it, but hey, at least I finally did it (and miraculously they still fit, even after a baby!), and it really only took an hour. Unfortunately, I never know what to pair with prints, so I went with the ever-safe black top. I've got plenty of black tees, but no warmer tops, so I whipped up a dolman-sleeve black sweatshirt with my own trusty pattern. This is oh, top #6 using this pattern?

Anyway, I'm still waiting for 1) the weather to cool down enough to wear long pants and a sweatshirt, and 2) the courage to step out of the house in leopard-print pants (for some reason they just read cougar to me and make me feel like one of those trashy people on reality TV). We'll see when that happens...


Outfit #2: Me-Made Slob
The polar opposite of the previous outfit, here we have my lounge-around-the-house-with-all-stretch-fabrics combination. I love all the Lindens and Hudsons floating around out there in the SBC, but rather than pay $16 and $10 respectively, I went the indie-4-less route as inspired by Sew Sorry Sew Fat and used McCall's 6992 and Simplicity 1428 instead, both purchased on sale at Joann's for a total of less than three dollars. I cut a size bigger than my normal for the pants, and then forgot that seam allowance was 5/8" instead of 1/4", so they turned out rather huge, but hey, I can always use more Aladdin pants in my wardrobe. The sweatshirt has a little wider neckline than the $3-at-Walgreens crewnecked stranglers of my childhood, which pleases me to no end. I love my collarbones, and prefer to display them when I can, even if they're all covered with tiny scabs these days, thanks to SHB's wicked daggers-for-fingernails. I've already worn this sweatshirt multiple times and am even contemplating making an identical backup. Or maybe I'll just invert the colors so as to not be quite so silly?


Outfit #3: Paisley, the Official Print of Biology Majors
Because you know, it looks like paramecia. Unfortunately, these microbes were printed slightly off-grain, so a straight hem results in a crooked line of paramecia/paisleys. I bought this rayon challis in Seattle last year while hanging out with Amy, Morgan, and Meris, and it only took me a year and change to sew it up...

I wanted more tunic-length tops to go with leggings, since post-pregnancy, there are days when I prefer to wear leggings rather than real pants. To accomplish this, I merely lengthened my old standby, OOP Simplicity 8986, and added a casing for an elastic waist.


Outfit #4: The Simplest Tunic Top
Another tunic to go with leggings, this top is so easy it's ridiculous. I just cut a square of this burnout rayon jersey and sewed two inches on either side of the top for shoulder seams, then sewed two straight lines down the sides. The excess fabric on either side makes it look fancier than it is really is. It's very similar to this top I made four years ago, but even easier since knit edge don't need to be finished and I didn't even have to cut a neckhole or round off the side "wings." Incidentally, I still wear that top -- it's survived several progressions of my sewing and subsequent closet purges -- which surprises me, considering how simple it was to make.


Outfit #5: Bowing to Peer Pressure Top
Everyone in the SBC has made a Kirsten Kimono Top it seems, and everyone in my house (all the humans, at least) have a gray shirt with stripes on it. To kill two birds with one stone, I made a stripy Kirsten. The fabric was from the Michael Levine Loft, purchased a year ago when I went to LA for our babymoon. And now here I am wearing the fabric in garment form with said baby!

Whew, that was quite a backlog of projects!

Summary:
Fabric: All of it was stash at least a year old, so I'm pretty pleased with myself. All in all, I used up eight yards of various cuts.
Hours: Ten-ish, over the course of the last month.
Total cost: The materials for outfits #1-2 were free, since they were all inherited from other people's stashes. The rest of the garments probably cost about $10.
Will you make it again? Many of these patterns are TNTs for me, so undoubtedly yes, and the Kirsten could become one. The only one that's a maybe is the Simplicity pants pattern.
Final thoughts: Outfits #2 and 5, while not very impressive-looking, are actually really important to me in that I'm finally venturing into sewing comfy-wear. Previously, I got all excited to sew pretty dresses and fun costumes, while my RTW lounge-about-and-run-errands wear got rattier and rattier. Now I'm finally making headway into replacing that category with me-mades!

I also managed to make a pretty epic baby quilt for a dear friend during the past month, but somehow I managed to not take any photos of it! And now that she's had the baby, I'm pretty sure the last thing she needs is a request to go take a picture of the quilt, so do your best to imagine something like this in pink, gray, and turquoise prints, with a Little Miss Hug applique on a gray and white polka dot backing. I think that's the first time photos have totally slipped my mind like that, but that might also be because I was working on it until the night before we flew out to San Diego to deliver it. This has not been such a good month for sewing+photos! Have you ever forgotten to take any pictures of a gifted me-made?


Sunday, July 12, 2015

This Most Excellent and Audacious Hobbit


I just can't seem to stop with the Middle Earth crafting! What can I say, SHB needed more pillows and the pillows needed covers, so if I'm going to be doing home dec sewing, I might as well make it more interesting. And fifty times more involved, so that a should-be-twenty-minutes project turns into a whole weekend project.

SHB has discovered the fun of crashing face-first into a pile of pillows; now that he's very mobile, he assumes that there will be a pillow every time he falls over. The only solution then (because you can't reason with a nine month old) is to put pillows everywhere in his room, in hopes that at least one of them will be in the right place at the right time. However, he also likes crashing with his mouth open and tongue sticking out, so the pillows need washable covers. I've had these geeky pillows in the back of my mind for years now, so this was my excuse to make my own. The free cylindrical bolster that came with our bedding set meant that I could make it slightly more hobbit-shaped, and less Bombur-shaped. I didn't have a specific outfit in mind when I planned it out; it was more or less dependent on the fabrics I had available, but it's probably most similar to Frodo's costume when he first sets out in FOTR.

A closer look at his waistcoat, complete with faux welt pockets. His hand's curve obviously needs more work, but I wasn't going to redo them. This is only a pillow cover, after all. 
His hair was the most tedious to sew. Why do hobbits have such messy curly mops of hair?
The back of his cape opens up with a velcro closure so that I can remove the pillow. 

Summary:
Pattern: My own, my precious!
Fabric: I cut up some old tees (that donation pile is really shrinking, thanks to SHB's clothing, my new undies, and this project!) and used some other scraps from my stash, so this pillow is very eco-friendly! I think that's fitting, as we know all hobbits share a love for things that grow, which I think would extend to being generally green.
Notions: Steam-A-Seam Lite to help hold things in place before stitching them down, velcro for the back closure, and four tiny 1/2" brass buttons for the waistcoat, because even though this is supposed to be Frodo, it's a nice nod to Bilbo's that were lost in The Hobbit.
Hours: Eight? A whole weekend's worth of naps and evenings, but totally worth it!
Total cost: $0!
Final thoughts: If only all home dec sewing was so fun! One could argue that I should just make it so, but I think Mr. Cation might have a word or two to say about having our entire house look like my college dorm room...

Of course, I had to make all the relevant parties take a picture with the newest member of the family:

Smaug and the wrong Baggins. Also, figures not to scale. 
"Samwise, where are you? There's a gangle creature coming for me! It has an ill-favored look, skulking about like that."
"Help, he's knocked me over! Which isn't very hard to do, since apparently I can't even walk without falling over in the movies."
"What has it got in its nasty little pocketses?"
"Curses! It doesn't have the precious, the filthy hobbitses! Gollum, gollum."
"We like goblinses, batses and fishes. But we hasn't tried Hobbitses before. Is it soft? Is it juicy?"
The answer is yes, yes it is tasty.

And another Walnut bonus:

Frodo and Samwalnut are ready to set off for Mt. Doom. Samwalnut is skeptical about the choice of a guitar case for carrying luggage, though. 

"I can't carry the ring for you, Mr. Frodo, and I can't carry you either...you're kind of awkward and unwieldy!"

I promise I've been sewing real clothes, but it's just so hard to arrange for picture-taking time these days!

Thursday, July 9, 2015

The Return of the Dark Lord

Remember how I sewed underwear that one time, and I made the stunning connection that if underwear = unmentionables, and Lord Voldemort = He Who Must Not Be Named, then underwear = the sewing equivalent of Voldemort? If you don't, you're totally excused, because it happened three years ago.

After that first foray into sewing lingerie, I got all excited and went out and bought more wide stretch lace for making more pairs, only to get sidetracked by something else (oooh! squirrel!). The poor lace sat in my stash for the next three years, until one day last week, I read the sewcialist blog and found out that July is officially Lingerie Sewing Month.


I'd been doing a lot of mending and alterations and refashions, and then I had a couple of not-quite-successful makes, so I was feeling uninspired. At first, I thought I'd just sew up a couple pairs to get my sewjo going again, but then I was seized with the Must Make All The Underwears frenzy and went on to feverishly sew a whole week's worth of them over the next several nap times. They're the perfect project for someone whose life is dictated by when the baby sleeps, because you can still get most of one finished even if SHB only naps for half an hour.

Because prolonged wear revealed that I wasn't a fan of the Lacy Tanga pattern I used last time (too low of a rise in front, although it does do its originally intended job of eliminating VPL), I decided to go on a pattern testing spree.

I started with Butterick 4331, a 1970s lingerie pattern, using my hacked up Blank Canvas Tee for fabric (when I was going through my closet and culling me-mades, I realized that I had somehow managed sew up the whole tee with the wrong side of the jersey facing out):


Verdict: kind of pretty I guess, but like one would expect from a Big 4 pattern, especially one drafted for the little-to-no-ease knits of the 70s, there was waaaaay too much ease. I cut off a whole two inches on each side seam! Also, I didn't have the right elastic in my stash yet, so the stretch lace I used for the leg openings is much too wide. It looks okay until you look at the crotch.
Mr. Cation's judgment: agreement re: the lace width, plus the color is off-putting because it's the same color as this one free t-shirt that we got in college -___-


Next up: So Sew Easy's free Cheeky Undies pattern, so that I could use up my stashed lace.


Verdict: again, pretty to look at, but unfortunately not practical for wearing. The pattern is clever in that it makes use of the scalloped edge of the lace, so no edge finishing is needed and there's no VPL to boot, plus it sews up ridiculously fast (maybe 15 minutes from cut to finish). However, if your lace is not very wide (the pattern calls for 4-6", mine was 5"), the rise is very low. I also have a pretty major concavity where my leg meets my hip in front, so the straight line of the lace results in too much fabric flapping around there (Especially obvious in the picture of the burgundy pair). If I'm feeling really motivated, I might go back and add elastic there to reign it in, but TBH, I probably won't.
Mr. Cation's judgment: "Ooh, those are nice!" But when I pointed out the extra fabric, he agreed that they weren't the best for long-term wear. "But you can just wear it before sexy times, right? Because you'll only need to wear them for a few minutes!"


Trial pattern #3: Cloth Habit's free Rosy Ladyshorts pattern, which calls for a 4-way stretch fabric with 60-70% stretch. I used an old t-shirt that had a 5% spandex content, but it was the only one I had and I can foresee having trouble sourcing appropriate fabric in the future. I also hadn't received my FOE in the mail yet, so the elastic is a mix of 1/4" elastic from Daiso for the leg openings, and 3/8" elastic from an Italian supermarket for the waist.


Verdict: Very comfortable, thanks to the elasticity of the fabric, and good coverage because of the cut. I obviously didn't go the recommended route with the stretch lace fabric and trim, instead opting to use what fabric and elastic I had on hand, so the final product is more functional than pretty. Still, I could see these making it into my regular rotation. If only it wasn't so hard to find fabric with the right stretch! Girl Charlee lists percent stretch on their website, but very few other knit stockists do. I tried calling some fabric websites' customer helplines and they were entirely unhelpful, so this might have to be a buy-in-person-and-bring-measuring-tape-to-test-stretch pattern, which defeats the purpose of being green by recycling old tees to make underwear.
Mr. Cation's judgment: YES. Surprisingly, it turns out that these were his favorite. Apparently he likes the boyshort cut, even though he doesn't get why they're called that. "They don't look anything like my shorts."

Trial pattern #4: So Zo's free knickers pattern, which were ideal for recycling old 100% cotton, minimal stretch/recovery, run-of-the-mill single jersey t-shirt fabric. In other words, all my free tees from college can be turned into underwear now.


Verdict: My personal favorite of all the patterns I tried! These were supremely comfortable and my prescribed size-according-to-my-measurements fit right off the bat without any adjustments. I think this will be my go-to pattern when I need new underwear. After the first pair, I did make the tiny adjustment of lowering the center back rise, much like Allspice Abounds described when she made up this pattern. My FOE joins also need a lot of work.

I tried three different ways, and none of them are satisfactory: making a closed loop first, overlapping, and applying it before joining the side seams and then serging the cut ends.  Anyone have any wisdom to offer?

Mr. Cation's judgment: Fine, but as I mentioned above, he's not as much a fan of the bikini briefs. He is, however, a fan of saving money by using up old tees, so there's that.

All in all, my second foray into making underwear was quite successful! I came out of it with four wearable everyday pairs, and three bonus pairs. And then because I still had quite a bit of the red jersey left, I went ahead and made the matching slip from the Butterick pattern.

First, a close-up.  
Of course, I couldn't escape without at least one mishap...the lace on the back is wrong side out! *headdesk*

Summary:
Fabric: 3.5 old tees, doomed for the donation pile, all cotton.
Notions: Yards of 1.5" wide black stretch lace, inherited from a destashing friend; a few yards of black 5/8" FOE; miscellaneous stash elastic and ribbon
Other: A Sharpie laundry marker to draw cats on the one pair
Hours: This was several days' worth of naptimes; the intial pair took a good hour to figure out fit and process, but by the end I could bang out a pair in 15-20 minutes. I'd say that including the slip, this was a good six hours.
Total cost: $5 for the FOE, everything else was free from the stash! Although I guess if you were to be honest about the original cost of the wide stretch lace, that would bring the cost up to oh, $10?
Will you make it again? The Lady Shorts and the So Zo panties, yes; everything else, no.
Final thoughts: I never thought that sewing underwear would be so satisfying. I'd always dismissed it as one of those things that only "hardcore" people do, but I think it actually makes a lot of sense for a beginner sewist with the right pattern. There's nothing too difficult technique-wise, knit fabric makes for relatively easy fit, and unlike floofy party dresses you can definitely wear the results everyday. Bonus: if they turn out ugly, nobody will know since they're hidden under your clothes...I hope. Unless you're Superman, with his whole undies-outside-his-tights look. And I'm guessing that if you're going to be criticizing Superman for his Becky Home-Ecky undies, we've got bigger problems than that.

Lastly, I know that readers prefer live models instead of just laying garments out flat, or even mannequins, so here's Walnut to model the matched set!

Why is red so hard to photograph? None of these pictures really captures the color. And then it really throws off the color balance of the whole photo and washes out Walnut's luscious fur.

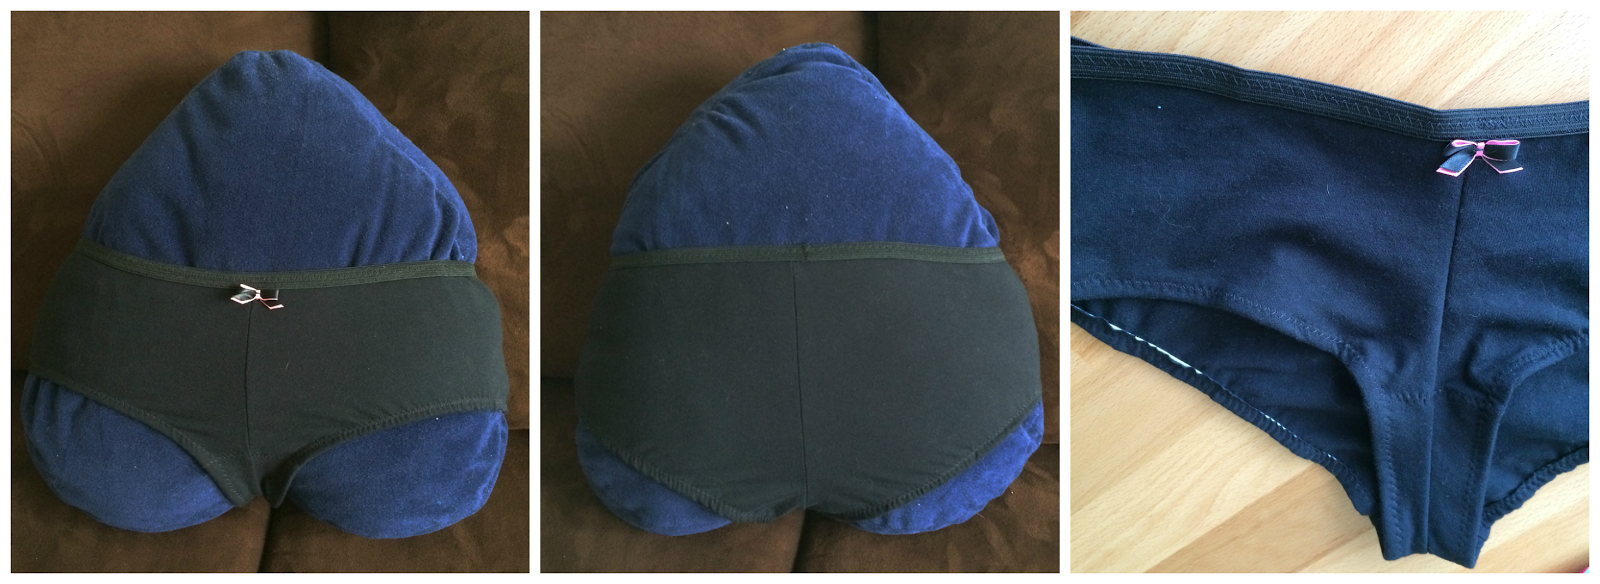
Thank you for sacrificing your dignity for the sake of my getting photos, dear. And the honorable mention for lingerie model goes, of course, to my handy IKEA heart pillow, whose circumference more or less matches my hip measurement and whose rounded edges make a remarkably decent substitute for leg stumps/butt cheeks. 


I am grateful for the proverbial kick in the pants (I didn't realize that this was Brit-speak for underwear, and American pants = trousers for them...oops!), Gillian et al! Lingerie-sewing was just what I needed. Now it's back to figuring out what my teaching wardrobe needs for the fall.

[ETA: I tried to test out the Indigorchid free T-shirt Underwear pattern too, since you know, t-shirts! Unfortunately, I couldn't get it to print right since two of the pages are scaled for a different size sheet, but you might be able get it correct with some futzing around with scaling. I just didn't have the time because SHB woke up.]